Authentic Melt-in-Your-Mouth Danish Butter Cookies
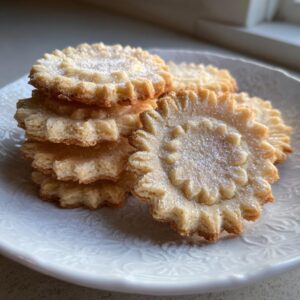
You will learn to make classic butter cookies that achieve that signature melt-in-your-mouth texture and rich, buttery flavor, just like the ones from the classic tins. This easy recipe is perfect for holidays or teatime.
- Prep Time: 20 min
- Cook Time: 12 min
- Total Time: 92 min
- Yield: About 3 dozen cookies 1x
- Category: Dessert
- Method: Baking
- Cuisine: Danish
- Diet: Vegetarian
Ingredients
Scale
- 1 cup (2 sticks or 226g) unsalted butter, softened
- 3/4 cup (150g) granulated sugar
- 1 large egg yolk
- 1 teaspoon vanilla extract
- 2 1/2 cups (300g) all-purpose flour
- 1/4 teaspoon salt
Instructions
- In a large bowl, cream the softened butter and sugar together with an electric mixer until the mixture is light and fluffy. This step is key for texture.
- Beat in the egg yolk and vanilla extract until just combined. Scrape down the sides of the bowl as needed.
- In a separate bowl, whisk together the flour and salt. Gradually add the dry ingredients to the wet ingredients, mixing on low speed until a soft dough forms. Do not overmix.
- Shape the dough into a log, wrap it tightly in plastic wrap, and chill in the refrigerator for at least 1 hour. Chilling helps the cookies hold their shape during baking.
- Preheat your oven to 350°F (175°C). Line baking sheets with parchment paper.
- Remove the dough from the refrigerator. You can either slice the log into 1/4-inch thick rounds or place the dough into a cookie press fitted with your desired decorative tip.
- Place the cookies onto the prepared baking sheets, leaving about 1 inch between them.
- Bake for 10 to 12 minutes, or until the edges are lightly golden brown. The centers should still look pale.
- Let the butter cookies cool on the baking sheet for 5 minutes before transferring them to a wire rack to cool completely. This ensures a rich, buttery texture that dissolves in your mouth.
Notes
- For an authentic Danish style, pipe the dough into rosettes or swirls.
- If you want crisp edges, bake for an extra minute or two, but watch carefully to prevent browning.
- For a variation, dip half of the cooled cookie into melted semi-sweet chocolate and let it set before serving.
- Use high-quality butter; this recipe relies on its rich flavor.
Nutrition
- Serving Size: 1 cookie
- Calories: 135
- Sugar: 8g
- Sodium: 45mg
- Fat: 9g
- Saturated Fat: 5g
- Unsaturated Fat: 4g
- Trans Fat: 0g
- Carbohydrates: 13g
- Fiber: 0g
- Protein: 1g
- Cholesterol: 30mg